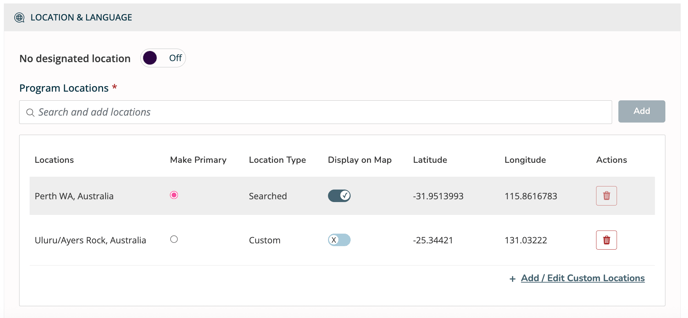
Program Locations refer to the on-site locations that administrators enter when creating an Internal Program Brochure. These locations can be searched using our built-in Google integration or added as Custom Locations by administrators with permissions. The Custom Location feature allows administrators with permission to add unique program locations to Internal Programs based on organizational needs. This feature allows admins to create customized program locations when a searched program location is not available or the location name does not match the preferred nomenclature. As a result, this feature supports a fully customizable experience and allows administrators to add more remote or 'off-the-beaten-path' destinations.
Custom Locations can capture the following information. Required fields will have an asterisk associated with relevant fields...
- City*
- Country*
- Via Country Code*
- Latitude
- Latitude
Custom Locations are created and added in the Location & Language section of the Program Brochure. Admins can customize the name of the location, choose the relevant country of the location, and provide the latitude and longitude coordinates if desired.
Once a new Custom location is added, admins can...
- Designate it as the Primary location
- Toggle on to Display on Map
- Remove other non-primary locations from the program by clicking the trash can icon within the Actions column

To display a Custom Location on a Map, the custom location must include the Latitude and Longitude coordinates from Google Maps.
Longitude and latitude must be in the correct format and not contain any special characters. Below are examples of acceptable and unacceptable formats
✅ Correct:
Longitude: 51.507222
Latitude: -0.127500
❌ Incorrect:
Longitude: 1.3521° N
Latitude: 103.8198° E
When creating Group Plans in batch from the Internal Term dashboard view within Via Global, a searched location must be included on the Program to successfully associate it with the Plan.
To create a new Custom Location to add to a Program...
- Click Programs
- Click the Edit Program icon (pencil icon) on the Quick Actions column
- Scroll down to the Location & Language section
- Click + Add/Edit Custom Locations
- Click on the Custom Locations dropdown
- Click + Edit Locations
- Click + Create New Location
- Fill out the required fields. Complete the optional fields, if desired.
- Click the Add button
- Click the X in the top left-hand corner to close the "Add/Edit Custom Locations" panel
- Select the new Custom Location from the dropdown
- Click the Add button
- Click Save button within the header of the Program Modify page.
